Ultimate online guide to using Trello – Create and use a card
How to create and use a card in Trello
In our system, we create a card for each article.
There are two ways to create a card:
1. At the bottom of a list, click on ‘Add a card…’
2. On the top right hand corner of a list, click on the arrow, then on ‘Add card…’
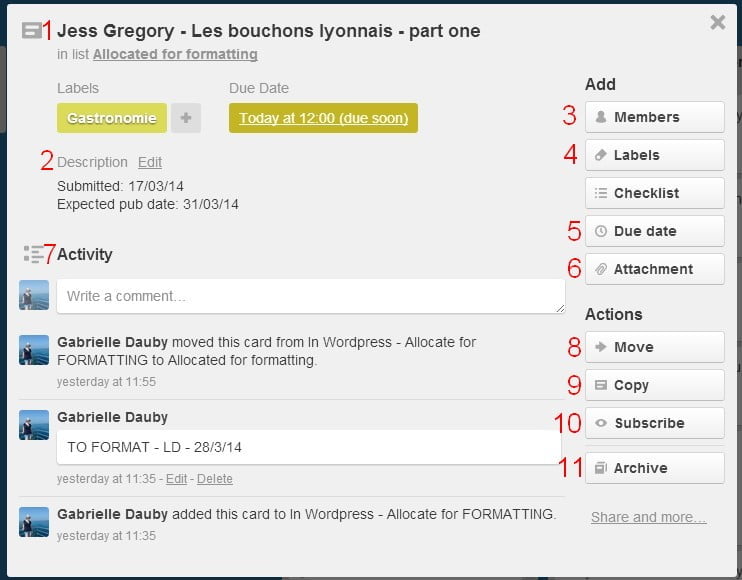
This is what a card for an article looks like:
*[UPDATE 2016]
– Please insert the THEME left of Title eg: [THEME – NAME – TITLE OF ARTICLE]
1. Title
*Author Name – Title of article
2. Description
In the description, you’ll find the submission date, the expected publication date, the sub-category, and the keyword(s).
3. Members
If you want to draw a particular member’s attention to one article, click on members and add the person.
4. Labels
There are two labels to be attached:
a) The first label corresponds to the main categories we have on the website:
– Green: Escapades
– Yellow: Gastronomie
– Orange: Reportage & Société
– Red: Vie Française
– Purple: Arts & Culture
– Blue: Mode & Beauté
b) The second label corresponds with the type of author: Contributor (internal & external) or Collaborator
5. Due Date
If you expect an article to be completed by a specific date, add a due date. You’ll mainly use this function when allocating work to team members.
6. Attachment
Attachments can be added to the card – submitted article, sub-edited, reviewed.
7. Activity
In the activity part, you can keep track of every action happening to the card. You can also add comments. There is also a function to mention a specific person in the comment: type ‘@’ then the username of that person. They will be notified.
8. Move
To move a card to one list to the other, click on ‘Move’, and select the target board and list.
9. Copy
You can also copy a card to another board/list.
10. Subscribe
If you’d like to know what’s happening to a specific article, you can subscribe to the article and get notified when an action occurs to that article.
11. Archive
If a card is not useful anymore, you can archive it.


